Categories
Android Linux Ubuntu

< waiting for device > – fastboot

My TF201 is well and truly out of warranty now so I thought I might try and get dual boot to ubuntu running on it. I’m still trying to find some up to date instructions, and kind of feeling my own way by amalgamating approaches from various sources. I’ll let you know how I get on.

In the meantime, when you are trying to install an image via fastboot and you keep getting stuck at:

< waiting for device >

with no response; try running it with sudo!

Categories
Linux Ubuntu

Getting the power button on the BBS2 to shutdown ubuntu

Nice and simple:

sudo apt-get install acpid
Categories
Linux Ubuntu

The most TOP utilities for Ubuntu Server

I know this will apply to various linux distros, but continuing the theme of blogs about installing Ubuntu Server on my BBS2, I give you some Top hints for some Top utilities on the command line.

  • top – You most probably already know that running ‘top’ will show you a list of processes and you can see their cpu usage alongside the total cpu usage.  If you press 1, and you have multiple processors it will break down the stats by processor.
  • iotop – You’ll probably have to apt-get install iotop, this little utility shows you the top disk i/o processes detailing the transfer read and write rates.
  • iftop – You’ll probably have to apt-get install iftop, this one shows you the network useage, nicely broken down by destination, sent / received with totals etc.

So think of these Top utilites next time you need to monitor your server in ubuntu.

Categories
Ubuntu

Installing Ubuntu on the BBS2


So I had a bit of experimentation with the BBS2. I had purchased the storage drives (2x Samsung HD103UJ SpinPoint F 1TB Hard Drive) but had decided that I did not want the OS to be installed on the raid.  So after scrounging a 160GB maxtor off a friend I installed Ubuntu Jaunty and successfully got the raid going, mounted and working.  However, at the time Jaunty was only in beta, and there seemed to be some stability problems (which would be expected), over 48 hours I had 2 kernel panics that completely halted the system.  I was not able to determine the cause.

bbs2-297x300

Realising that I need this to be as stable as I can, I then opted for Ubuntu Hardy LTS, which has been around for a year now and would be much more stable, plus it’s supported with fixes for the next couple of years as well. Leaving the sever to run, I then noticed that the core temperature was getting a lot higher than expected, the Maxtor Diamond Max Plus 9, was running at near to 50 degrees and when the Samsung drives were moved adjacent to the Maxtor, their temperature went up to 42-45 degrees, this is within the operating temperature but I didn’t like the idea of them running at 10 degrees above their normal operating temperature.

So I purchased an old 8Gb Corsair Voyager GT from the same said friend, which has a 10 year replacement guarantee, stuffed it in a free USB port, installed Ubuntu Hardy to that and it works a treat. Bootup time is as fast if not faster than when installed on the Maxtor SATA drive, it’s plenty big enough for the OS, I mounted it with noatime, nodiratime, and the drives are sitting nicely at about 33 degrees c.

The BBS is acting as a print server, samba server for the wife’s Vista laptop, NFS server for me, has apache installed and exposed as http and https for providing my svn server (still to do).  All the data is on the raid, which is currently defined as raid 5, but only has two drives and is therefore mirrored, but as my storage needs increase, I now have 3 free slots, bring the system to a maximum of 4Tb if needed (maintaining the current 1Tb drives).  If I need more than that I can even purchase a second drive only box to get another 5 bays attached by eSata.

Some useful resources and tips when setting up the server

Setting up automatic updates in Ubuntu Hardy

Adding users, new users to groups and new groups

Creating self signed certificates for apache

Getting system temperature and sensors information:

  • apt-get install lm-sensors, run sudo sensors-detect and answer yes to everything. Reboot, then run sensors to see all the info.
  • apt-get install hddtemp don’t bother running as a daemon, run sudo hddtemp /dev/sd[e.g. a].

Easily enabling remote access for Cups:

  • install lynx (the command line browser)
  • run lynx localhost:631
  • choose administration menu, then Basic Server Settings, Check Share published printers and allow remote administration. Change Settings and quit. Then in your nice gui browser goto machine name :631 and add printers, etc.

Install ebox it’s a great web admin interface, add the first line to /etc/apt/sources.list then run the second:

Install the ubuntu profiles for screen (screen allows you to start multiple bash sessions / run applications and they stay resident so you can re-attach to them in case of network dropout it’s cli based and can be run in an SSH connection), add the first line to /etc/apt/sources.list then run the second

Categories
Linux Ubuntu

How to create a self-signed Certificate for apache

Great article that explains the steps need to get your own self-certified ssl going in apache2

How to create a self-signed Certificate.

Categories
Hardware Linux Ubuntu

Ubuntu Server – Creating an expandable Raid5 Array starting with 2 disks

Again, I’m using VirtualBox to test this, I have a single OS drive with Ubuntu Server (intrepid) installed. I’ve added two 2gb virtual disk to it, which will be the starting point of the Raid5.  Most places on the net say you need at least 3 disks to run raid 5, but let’s see what happens.

Lets create the raid:

mdadm --create /dev/md0 --level=5 --raid-devices=2 /dev/sdb /dev/sdc

The raid gets created! and we can monitor it with

cat /proc/mdstat

When it has finished intitialising, create a file system on the raid array (ext3):

mke2fs -j /dev/md0

create a mount point (/raid) and mount it

mkdir /raid
mount /dev/md0 /raid

df then reports it as having 2Gb free.  Both my VM drives sdb and sdc are 2Gb, so the assumption is it is simply mirroring the data in 2 drive mode.  This is exactly what we want, as when I get a new drive later on, I want to add it to the raid and see an increase in disk space.  So lets test that, shutdown my machine and add a new drive.

Add the drive to the array

mdadm --manage --add /dev/md0 /dev/sdd

now when I run cat /proc/mdstat it says there are 3 drives in the arras but sdd is marked (S)

Lets now grow the array

mdadm --grow --raid-disk=3 /dev/md0

Watch the progress with cat /proc/mdstat and when complete we can mount it. (adding the 2Gb took about 5 mniutes! eeek! to grow the array).

After completion /proc/mdstat now reports 4gb available, but the file system on the raid still thinks it’s 2gb.

So let’s resize it:

e2fsck -f /dev/md0
resize2fs /dev/md0

Re mount /dev/md0 and df now reports 4Gb.

Success.

Categories
Linux Ubuntu

Ubuntu Server – Remove Raid Array

Nice and simple:

mdadm --stop /dev/md0
mdadm --remove /dev/md0
mdadm --zero-superblock /dev/sdb1
mdadm --zero-superblock /dev/sdc1
Categories
Hardware Linux

Ubuntu Server-Reinstallation and re-configuring existing Raid1

Following on from my article on Setting up and Managing Raid1 on Ubuntu Server, I have been testing the raid using a VirtualBox VM.

Today, I took the VM, consisting of an OS drive (with Ubuntu Server installed) and 2 drives set up in raid 1 configuration and created a new OS drive, replacing the existing OS. The intention is to test inserting a new OS drive, re-installing the OS and getting the raid working again without loosing any data.

Useful Reference the mdadm man page

I installed the OS and installed mdadm as per the instructions in my previous post.

All commands are issued as root / sudo

So let’s see if can obtain any information about the raid, we’ll see what it knows about sdb1 which was part of the raid 1 with sdc1:

mdadm –examine /dev/sdb1

It successfully detects that the drive has a superblock and knows that it was part of a raid with /dev/sdc1. See the last two lines of the output.

So lets try to re-assemble the raid.

mdadm –assemble /dev/md0 /dev/sdb1 /dev/sdc1

It responds saying /dev/md0 has been started.

So now we only need to create a mount point

mkdir /raid

and mount it

mount /dev/md0 /raid

We have successfully mounted the raid so let’s now put an entry in fstab so it mounts at startup.

nano /etc/fstab

add

/dev/md0           /raid          auto     defaults        0      0

reboot and all should be working.

Categories
Hardware Linux Ubuntu

Ubuntu Server-Setting up and managing Raid1

In preparation for getting my Tranquil PC BBS2, on which I plan to install Ubuntu server on the “OS disk” and have initially two 1TB drives in Raid1 configuration and add an additional 2 later as my storage needs increase, I decided to investigate how to install and configure the raid in such a configuration.

Note: In my configuration, I am setting up a NAS / Home server, I have a single drive for the OS that is not raided as I don’t mind having to re-install the OS if that drive fails. (Which I will test in the near future that I can re-add an existing raid to a new install) The Raided drives are the drives that will store the data shared on the NAS.

I did the test using Virtualbox, creating an OS virtual disk and 2 virtual disks for the raid. I initially only mounted the OS disk and performed an usual

So with ubuntu installed, and the two drives to be raided added to the vm:

All the following commands should be run with sudo or as root.

Creating the Raid array

First we need to install mdadm (I think it means mutli-disk admin), the utility for managing the raid arrays.

Unfortunately, when I tried the expected sudo apt-get install mdadm, there were some weird package dependencies (known issue) that also install citadel-server, which prompts for loads of unexpected configuration. To get round this, do a download-only of mdadm then run the install with dpkg.

sudo apt-get --download-only --yes install mdadm
sudo dpkg --install /var/cache/apt/archives/mdadm_2.6.7...deb

For each drive in your raid array, run fdisk or cfdisk and create a primary partition that uses the whole drive. These partitions should be the same size. If not the smallest size will be used for the size of the raid array. The partition type needs to be set to type ‘fd‘ – Auto raid – Linux.

fdisk /dev/sdb

Next, run mdadm to create a raid device (/dev/md0 (thats md followed by Zero) you have to call it mdX where X is an md device not in use) we set the raid level to raid1 (mirroring) and the number or devices to be included in the raid to 2 followed by a list of the disk partitions to be used.

mdadm --create /dev/md0 --level=1 --raid-devices=2 /dev/sdb1 /dev/sdc1

The raid array will be created and you can monitor it’s progress by typing:

watch cat /proc/mdstat

Once complete, we now have a single device that can be mounted, however, it does not yet have a file system on it. I chose to format it as an ext3 fs.

mkfs -t ext3 /dev/md0

create a folder to mount the device in, I chose /raid , and mount it:

mkdir /raid
mount /dev/md0 /raid

The raid drive is now mounted and available. To get it to be mounted at system startup, we need to add an entry into the fstab.

nano /etc/fstab

add

/dev/md0           /raid          auto     defaults        0      0

reboot and all should be working.

Examining the state of the Raid

Whilst the raid is performing operations such as initialising you can see the status with:

cat /proc/mdstat

mdadm can also be used to examine a hard disk partition and return any raid state information including failed devices, etc.

mdadm --examine /dev/sdb1

Breaking the Array (Replacing a drive)

Building a raid array and not testing it, let alone not knowing how to fix it should a drive go fault is just stupid, so I decided to put the array through it’s paces using the wonderful VirtualBox. So, I shut the machine down and removed the second raid drive from the VM, sdc.

During boot-up I noticed a [Fail] on the mounting file systems and after logging in, the /raid mount was not available. This was my first surprise, I expected as on drive of the array was still plugged in and available, that the device would just be mounted with some form of notification of the raid not being correct. I have not investigated if changing the mount options in fstab would enable this yet, so if you know please comment.

So after logging in the raid device had been stopped, so I tried running it:

mdadm --manage -R /dev/md0

This was successful, and I could even mount the raid device and access the files on it, however it is running with only one drive now.

So, I shut down the VM and created a brand new disk in VirtualBox, and added it to the VM, emulating me replacing the drive with a new one. Started the machine up, logged in and ran mdadm as above to start the array.

Faulty devices can be removed with the following command replacing sdc1 with the partition to remove.

mdadm /dev/md0 -r /dev/sdc1

However, as I had removed the physical VM drive (a bit oxymoronic I know) the device was not classed as part of the array, so now I had to prepare the new drive ready for addition to the array.

So create a primary partition of the required size on the new drive using fdisk.

We don’t need to format it, as as soon as we add it to the array, the existing drives contents will be replicated.

mdadm --manage --add /dev/md0 /dev/sdc1

Run watch cat /proc/mdstat to see it re-building the array

I am now going to have a play with extending the array and seeing if I can start off with a raid5 two drive mode, if that can mirror until I add a 3rd and 4th drive then that migh mean a change in my approach for extending the storage in the future. Hope this all helps some other relative newbies to ubuntu and raid.
Categories
Linux Ubuntu

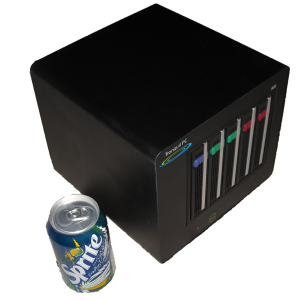
Tranquil PC Limited BAREBONE SERVER

Tranquil PC Limited BAREBONE SERVER.

Forget the Wind Nettop, this is the baby for me.  £360 including vat and delivery, the Tranquil PC barebones server provides you with 2G ram, 64 bit ready Intel Atom 330 (2×1.6GHz) Dual Core, 4 slots for Raid and 1 slot plain hot swap caddy, 1Gb lan, SiliconImage SiI3124 hardware raid, ~23dBA and only 29Watts power usage with a single drive.

Add Ubuntu server and it’s the perfect home NAS / web server / what ever you like.

I’m seriously considering this, along with a purchase of 2x 1Tb drives, to get me started. I’m happy to go with raid1 on those for now and add a couple more as I need more storage.

See the link above for more info….