Categories
Hardware Linux Ubuntu

Ubuntu Server-Setting up and managing Raid1

In preparation for getting my Tranquil PC BBS2, on which I plan to install Ubuntu server on the “OS disk” and have initially two 1TB drives in Raid1 configuration and add an additional 2 later as my storage needs increase, I decided to investigate how to install and configure the raid in such a configuration.

Note: In my configuration, I am setting up a NAS / Home server, I have a single drive for the OS that is not raided as I don’t mind having to re-install the OS if that drive fails. (Which I will test in the near future that I can re-add an existing raid to a new install) The Raided drives are the drives that will store the data shared on the NAS.

I did the test using Virtualbox, creating an OS virtual disk and 2 virtual disks for the raid. I initially only mounted the OS disk and performed an usual

So with ubuntu installed, and the two drives to be raided added to the vm:

All the following commands should be run with sudo or as root.

Creating the Raid array

First we need to install mdadm (I think it means mutli-disk admin), the utility for managing the raid arrays.

Unfortunately, when I tried the expected sudo apt-get install mdadm, there were some weird package dependencies (known issue) that also install citadel-server, which prompts for loads of unexpected configuration. To get round this, do a download-only of mdadm then run the install with dpkg.

sudo apt-get --download-only --yes install mdadm
sudo dpkg --install /var/cache/apt/archives/mdadm_2.6.7...deb

For each drive in your raid array, run fdisk or cfdisk and create a primary partition that uses the whole drive. These partitions should be the same size. If not the smallest size will be used for the size of the raid array. The partition type needs to be set to type ‘fd‘ – Auto raid – Linux.

fdisk /dev/sdb

Next, run mdadm to create a raid device (/dev/md0 (thats md followed by Zero) you have to call it mdX where X is an md device not in use) we set the raid level to raid1 (mirroring) and the number or devices to be included in the raid to 2 followed by a list of the disk partitions to be used.

mdadm --create /dev/md0 --level=1 --raid-devices=2 /dev/sdb1 /dev/sdc1

The raid array will be created and you can monitor it’s progress by typing:

watch cat /proc/mdstat

Once complete, we now have a single device that can be mounted, however, it does not yet have a file system on it. I chose to format it as an ext3 fs.

mkfs -t ext3 /dev/md0

create a folder to mount the device in, I chose /raid , and mount it:

mkdir /raid
mount /dev/md0 /raid

The raid drive is now mounted and available. To get it to be mounted at system startup, we need to add an entry into the fstab.

nano /etc/fstab

add

/dev/md0           /raid          auto     defaults        0      0

reboot and all should be working.

Examining the state of the Raid

Whilst the raid is performing operations such as initialising you can see the status with:

cat /proc/mdstat

mdadm can also be used to examine a hard disk partition and return any raid state information including failed devices, etc.

mdadm --examine /dev/sdb1

Breaking the Array (Replacing a drive)

Building a raid array and not testing it, let alone not knowing how to fix it should a drive go fault is just stupid, so I decided to put the array through it’s paces using the wonderful VirtualBox. So, I shut the machine down and removed the second raid drive from the VM, sdc.

During boot-up I noticed a [Fail] on the mounting file systems and after logging in, the /raid mount was not available. This was my first surprise, I expected as on drive of the array was still plugged in and available, that the device would just be mounted with some form of notification of the raid not being correct. I have not investigated if changing the mount options in fstab would enable this yet, so if you know please comment.

So after logging in the raid device had been stopped, so I tried running it:

mdadm --manage -R /dev/md0

This was successful, and I could even mount the raid device and access the files on it, however it is running with only one drive now.

So, I shut down the VM and created a brand new disk in VirtualBox, and added it to the VM, emulating me replacing the drive with a new one. Started the machine up, logged in and ran mdadm as above to start the array.

Faulty devices can be removed with the following command replacing sdc1 with the partition to remove.

mdadm /dev/md0 -r /dev/sdc1

However, as I had removed the physical VM drive (a bit oxymoronic I know) the device was not classed as part of the array, so now I had to prepare the new drive ready for addition to the array.

So create a primary partition of the required size on the new drive using fdisk.

We don’t need to format it, as as soon as we add it to the array, the existing drives contents will be replicated.

mdadm --manage --add /dev/md0 /dev/sdc1

Run watch cat /proc/mdstat to see it re-building the array

I am now going to have a play with extending the array and seeing if I can start off with a raid5 two drive mode, if that can mirror until I add a 3rd and 4th drive then that migh mean a change in my approach for extending the storage in the future. Hope this all helps some other relative newbies to ubuntu and raid.
Categories
Linux Ubuntu

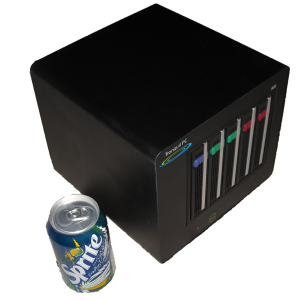
Tranquil PC Limited BAREBONE SERVER

Tranquil PC Limited BAREBONE SERVER.

Forget the Wind Nettop, this is the baby for me.  £360 including vat and delivery, the Tranquil PC barebones server provides you with 2G ram, 64 bit ready Intel Atom 330 (2×1.6GHz) Dual Core, 4 slots for Raid and 1 slot plain hot swap caddy, 1Gb lan, SiliconImage SiI3124 hardware raid, ~23dBA and only 29Watts power usage with a single drive.

Add Ubuntu server and it’s the perfect home NAS / web server / what ever you like.

I’m seriously considering this, along with a purchase of 2x 1Tb drives, to get me started. I’m happy to go with raid1 on those for now and add a couple more as I need more storage.

See the link above for more info….

Categories
Ubuntu

BBC iPlayer – Labs get Linux suport for iplayer downloads

The wonderful BBC have finally managed to bundle together a version of iplayer that allows you to download your TV for up to 30 days.  It’s still DRMed, using adobe flash and adobe air to give you the iplay application outside your browser.

Follow the link below, to the labs and click the button to enable the labs features.  Go to you favourite show, and click download.  You will be prompted to install Air etc, which takes a couple of minutes, but after that the download starts and the world is your mollusc.

BBC iPlayer – Labs.

Categories
Linux Ubuntu

Guts to go Gutsy

I was having problems with something in Feisty, which was obviously fixed in Gutsy because I can’t remember what the problem was after the hour so of the upgrade had passed. And it all worked from then on… Well there must have been some reason I decided to do it, and I am sure something was not working… anyway as there’s only a couple of days left before Gutsy is released, I figured I might be pretty stable by now so minimal risk.

I wasn’t disappointed.  A couple of third party bits needed re-installing, specifically vmware and nero, but apart from that it all went well. XGL and compiz still worked (however the original Feisty compiz-config needed removing and re-installing) and you even get a nice little message telling you not to run the XGL session as it will just work in the gnome one.

The new Screen and Graphics section doesn’t look to exciting to windows users, but it’s a god send when trying to use your laptop for presentations, at last an easy way to handle multiple monitors and resolutions.

More to come as I find stuff worthy of my attention, but to the Ubuntu team, bloody well done, it was such a smooth upgrade….

Categories
Linux

Pixel Image Editor – like Photoshop CS2 and cross platform too

So you want a cross platform Adobe Photo Shop that runs on linux ? Then look no further for an application that is at least as functional as CS2.

Pixel Image Editor

Pixel is running following platforms now: Windows, Linux/x86,
Linux/PPC, Linspire, Zeta/BeOS/x86, QNX/x86, FreeBSD/x86, MacOSX/PPC
and MacOSX/x86, MorphOS/PPC, eComStation, OS/2, SkyOS and DOS.

At the moment as it’s still pre v1.0 (not that you would know) it costs only $38!!!! with free upgrades up to version 2.0 and the license to run on any platform

Having used photo shop the interface feels totally natural. Everying is set out similar and there a few nice enhancements as well.

Some of the features:

Core

  • Pixel is an extremely small and fast application
  • it is easy to translate to any language as it supports full
    Unicode, all available translations are available at once (English,
    German, French, Spanish, Dutch, Slovak, Croatian, Swedish, Polish,
    Russian, Hungarian, Afrikaans, Brazilian Portuguese and others)
  • supports TWAIN compatible scanners, digital cameras
  • supports SANE compatible scanners, digital cameras and others (Linux, BeOS, eComStation)
  • pressure sensitive tablets support
  • printing support
  • multiple color managed clipboards
  • various image formats handling (GIF, PNG, JPG, TIFF, BMP, PSD…)
  • support for JPEG-2000 format
  • support for OpenEXR format
  • EXIF support

Image editing

  • support for layers, paths, channels, masks and selections
  • Color Management support for RGB, CMYK, Grayscale and CIE Lab modes (8-bit and 16-bit)
  • support for HDR (High Dynamic Range) images with 32-bit/channel
    precision, HDR images in Pixel are editable in full HDR quality, not in
    8-bit RGB as in competiting programs
  • realtime live effects for layers (adjustments, effects), sets of live effects can be saved as layer Styles
  • image browsing and searching
  • powerful text editing with spellchecking and support for IME/XIM (Asian languages)

Retouching

  • includes variety of brushes, including full-color brushes and animated brushes
  • brush retouching tools including special effects
  • retouching set of filter plug-ins

Web features

  • complex support for image slicing and image optimizations (GIF, PNG, JPEG, WBMP)
  • direct editing of generated HTML code without destroying user’s additions
  • support for clickable maps
  • support for small animations for your web pages (animated GIFs)
Categories
Ubuntu

Ubuntu – USB Drives – Optimising for quick removal (nearly)

As default USB drives in Ubuntu are optimised for performance, i.e. when data is written to the drive it is cached.  When you unmount or eject the drive, you usually get a notification to wait whilst data is written to the drive.

After searching a bit on the net I found that you can add a couple of options to the device, sync and dirsync that cause the data to by written synchronusly rather than caching it.  I have been running with this option enabled and it seems to work.

When I now eject the drive (NOTE: You still need to unmount / eject else you get a warning!) it ejects straight away without the please wait whilst the OS clears the  cache.

To set the option install gconf-editor if it is not installed via sudo apt-get install gconf-editor or synaptic package manager.

run gconf-editor from a terminal or choose Applications > System Tools > Configuration Editor.

Navigate to System > Storage > default_options

I added the option to the vfat section, which covers most usb flash drivers because they are Fat16 or FAt32.

I have not tried it with the ntfs etc, as I still want ubuto to cache writes to my ntfs partitions.

In the right had side, double click the mount_options item to bring up the editor

Click add, and enter
sync
choose Ok.

Click add, and enter
dirsync
choose Ok.

The options are now added. Click Ok to close the key editor, and close gconf-editor.

You should now be cooking on gas…

Categories
Ubuntu

Installing Ruby and rails on Ubuntu Feisty

The image “http://www.rubyonrails.org/images/rails.png” cannot be displayed, because it contains errors.

Found these instructions at http://www.aptana.com/forums/viewtopic.php?p=10640

Blogging to ensure I have a copy, credits go to janmartin.

Lets start with a fresh Ubuntu Feisty Fawn 7.04 installation:

  • sudo apt-get install build-essential
  • sudo apt-get install sun-java6-jdk
  • sudo update-java-alternatives –list
  • sudo apt-get install ruby irb ri rake rdoc ruby1.8-dev rubygems
  • sudo apt-get install libmysql-ruby mysql-server
  • sudo gem update –system
  • sudo gem install rails –include-dependencies

Some tests:

  • ruby –version
  • rails –version
  • mysql –version
  • gem list

END of command line installation

Download
Aptana + Rails (Linux).
Extract it into ~/aptana

Follow these instructions:
# Open up Aptana, and Navigate to the Help > Software Updates > Find and Install menu.
# Select “Search for new features to install”, click “Finish”
# Select “Ruby on Rails Development Environment”, click “Finish”
# Select the Ruby on Rails Development Environment feature.
# Continue through the dialog boxes until complete.

Follow these instructions:
http://www.aptana.com/forums/viewtopic.php?t=1397

Configure:
Menu -> Window -> Preferences

Rails -> Configuration
Rails path: /usr/bin/rails
Rake path: /usr/bin/rake

Ruby
Installed interpreters:
/usr

Ri/rdoc
RDoc path:/usr/bin/rdoc
Ri path: /usr/bin/ri

Finished!

Categories
Linux Ubuntu

Java Window blank or not rendering correctly when running under XGL/Compiz

I’m running Ubuntu with an XGL session and Compiz, and tried installing ArgoUML a java based cross platform UML designer. However when the application was run, the main window did not render correctly, it was blank with no menus or content.

A friend informed me of the solution, which affects Netbeans IDE as well, so the following:


sudo gedit /etc/environment

Add the following line

AWT_TOOLKIT="MToolkit"

save and close.

You may need to restart the session or reboot to pick up the environment setting change.

Categories
Linux Ubuntu

Linux how to change the file extensions for multiple files in a directory

Where source is old extension and dest is new extension, in terminal type:

for x in *.source; do mv “$x” “${x%.source}.dest”; done

Categories
Linux Ubuntu

Installing a nice black vista style theme from Ubuntu Studio

Feisty-UbuntuStudioTheme
Instructions on how to install the default UbuntuStudio theme in other Ubuntu distros.

http://www.belutz.net/2007/05/11/installing-ubuntu-studio-theme/